Self Muscle Massage - pt 13 Posterior Shoulder
This is part thirteen in the Self Muscle Massage Series. In the introduction post to this series we introduced and demonstrated the three muscle release techniques that will be used in this post. If you would like to review them, click here. If you would like to see any other parts of the series, click here.
In this post we’ll be moving on from the neck and back to the shoulder. Traditionally, the shoulder is considered the least stable joint in the body. Like the hip, the shoulder joint is a ball and socket joint. However, unlike the hip which is supported by the large gluteal and hip muscles, the shoulder has only the small rotator cuff muscles, deltoid, and inter-scapular muscles. This means two things: 1) that the shoulder is a very mobile joint (it can move in six different directions) and 2) it is a very common site of injury.
Due to the volume of material, we will discuss the shoulder in two posts- one on the posterior (back) and one on the anterior (front). In this post we will start with the back of the shoulder.
Anatomy
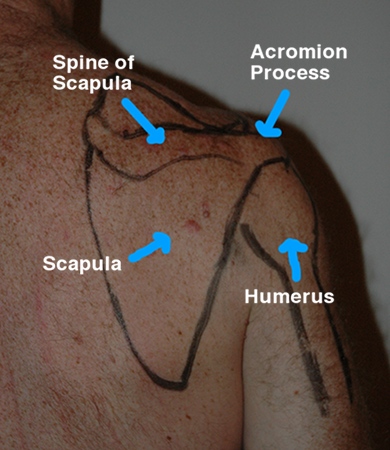
In your reading, you may have heard of something called the “shoulder girdle”. This is composed of three bones: the scapula, the clavicle, and the humerus. The scapula lays on the back of the rib cage (it is held in place by muscle) and connects to the clavicle/collar bone which wraps around from the top of your chest. These two bones meet on the outside of the shoulder at the acromion process (this is the bony bump on the outside of your shoulder). Just beneath the acromion is where the humerus (upper arm bone) attaches to the shoulder blade (the ball or head of the humerus connects to a socket in the scapula known as the glenohumerual joint). Part of the reason it is referred to as the shoulder girdle versus simply the shoulder joint is because there are actually two joints- 1) where the scapula and the clavicle/collar bone meet at the acromion (this is your AC joint) and 2) the glenohumeral joint where the humerus connects to the scapula.
#1 The Scapula (aka the Shoulder Blade). Think of the shoulder blade like a bony triangle that sits on the back of the rib cage and is held in place by muscle. The most prominent feature of the shoulder blade is the large bony ridge that runs across it. This is known as the spine of the scapula. If you reach over your shoulder with your fingers, this bony ridge will be easy to feel.
#2 The Acromion Process. The acromion process is technically the outermost edge of the scapula. It is an important bony landmark because where the acromion and the clavicle (collar bone) meet is your AC joint. While the AC joint is small, it is commonly injured when the clavicle is pulled away from the acromion (there are only ligaments holding the joint together and they can be torn). This is commonly referred to as a seperated shoulder and is graded in three levels of severity. A grade three is the worst and can be visually seen (the clavicle actually pops up in relation to rest of the shoulder). The easiest way to find the acromion is to start with your fingers on your collar bone and to follow it towards the outside of the shoulder. The outermost edge is the acromion.
#3 The Humerus. The humerus is the large bone of the upper arm. It travels from the elbow up to the shoulder where it connects to the scapula at the glenohumeral fossa (the humerus is the ball and the scapula is the socket). A unique feature of the humerus is the ball portion (also known as the head of the humerus). It is lined with grooves and tunnels where the rotator cuff and bicep/tricep muscle tendons travel through and attach. It is important to note that as your lift your arm, the head of the humerus rotates down to allow the longer shaft of the bone to travel without hitting the acromion process. In the event of injury or swelling, it is possible for this space to be decreased (a common injury referred to as Impingement).
Muscles
The muscles in the back of the shoulder joint originate in one of two places. They either begin on the scapula itself and move to the humerus or they begin on the humerus and attach to the scapula. There are two layers of muscles.
Layer One: the deeper layer.
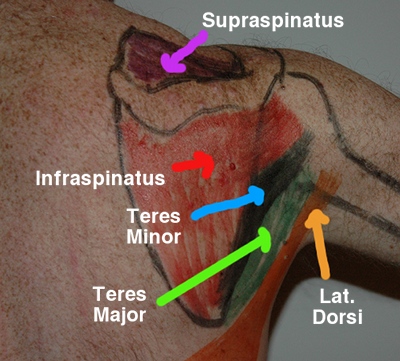
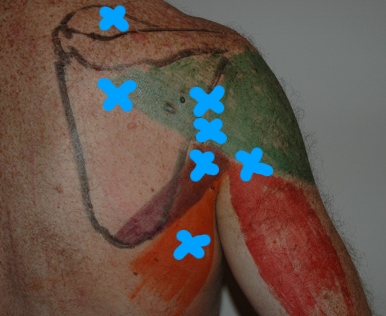
#1 Supraspinatus/Infraspinatus. Both of these muscles are part of your rotator cuff (there are actually four: these two, the teres minor and the subscapularis which is not pictured). They are the easiest to visualize and locate because they sit on either side of the spine of the scapula. The supraspinatus sits above the spine and the infraspinatus sits below it. Both muscles then travel to insert onto the back of the head of the humerus. These muscle are responsible for externally rotating the arm (external rotation would be if you tried to reach behind your head). To palpate them, reach your opposite hand over your shoulder. As you rotate your arm (reach behind your head and then behind your back), you will feel the supraspinatus above the spine and then the infraspinatus below it (you may need to change your hand position to feel the back of the shoulder under your arm pit for this).
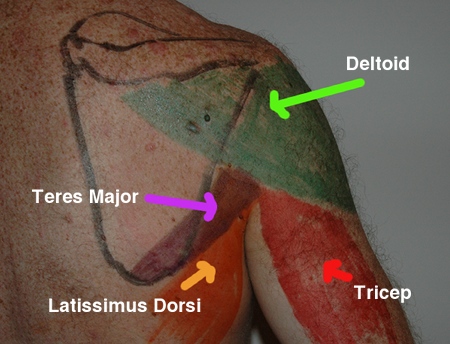
#2 Teres Minor/Major. Like the two muscles above, the teres muscles also start on the scapula and move to the humerus. The teres minor is the smaller of the two and runs along the inner border of the shoulder blade just below the infraspinatus. The teres major on the other hand starts on just the bottom edge of the scapula and then travels over to the humerus. The biggest difference between the two is WHERE they insert on the humerus. The minor inserts onto the back part while the major inserts onto the front of the humerus. This change in insertion allows the major to internally rotate the arm (this would be if you tried to reach behind your back to tuck in your shirt) and extend/adduct the shoulder (pull the arm back and in towards the body). The teres minor on the other hand is only responsible for externally rotating the arm along with the two rotator cuff muscles above. To palpate these muscles, reach your hand under your armpit to the back of your shoulder and rotate your arm. You will feel them moving beneath your fingers.
Layer two: the more superficial muscles.
#1 The deltoid. This muscle is the large tear drop muscle that drapes over the entire shoulder. Due to it’s size it is traditionally broken up into three parts (anterior, middle and posterior). All three originate on the humerus. The posterior portion of the muscle then moves to insert along the spine of the scapula. This muscle works to lift the arm out to the side (abduct), into external rotation (reaching behind the head), and into extension (pulling the arm straight back). Palpation of this muscle is easy. Just place your hand on your other shoulder and lift the arm out to the side. The deltoid will be the large muscle beneath your hand.
#2 The Tricep. This muscle is important to mention when talking about the back of the shoulder because it has two parts (a short head which works strictly at the elbow and a long head that works to extend the shoulder and pull the arm in against the side (adduction). The long head of the tricep works its way up from the back of the elbow joint to insert onto the scapula (just below the glenohumeral fossa (socket). In the event of inflammation or injury at the back of the shoulder, it is important to remember and work on this muscle to fully release the area. To find the tricep start with your hand on the back of your upper arm and straighten your elbow. You will feel the muscle moving beneath your fingers.
#3 The Latissimus Dorsi. Like the long head of the triceps, the Lat muscle is also important to mention in this discussion because it assists with shoulder movement but also because it travels through this busy intersection. The Lat muscle originates down in the lower back/ribcage and then wraps around the ribs up to the shoulder where it sneaks through to insert on the front part of the humerus (like the teres major). This attachment allows the lat to extend, internally rotate and adduct the arm.
Soft Tissue Release
What you’ll need: stick/foam roller and tennis ball
The techniques: click here for an introduction to the techniques and a video demonstration
1) Lengthening/elongation with the foam roller or stick.
2) Cross friction with your hand or tennis ball.
3) Sustained pressure or trigger point release with the tennis ball.
Key Areas to work on
#1 Foam Roller.
When working on the back of the shoulder, start by loosening up the larger and more superficial muscles. Position the roller horizontally and start by working on the trapezius muscle as a whole. To better lengthen the muscle fibers, you will need to change the position of your arms as you do so. While on the lower fibers, you will want to keep your arms down by your sides. While on the middle fibers, cross your arms behind your head. And lastly, while on the upper fibers, straighten your arms up over your head. These arms positions will help move the shoulder blade. From here, position the roller vertically (in the same direction of your spine) and lay on top of it. This will allow you to work on the muscles between the two shoulder blades as you roll side to side with your arms out at your sides. Next, position the roller diagonally and work the latissimus dorsi muscle. You will be able to work the muscle all the way from the rib cage up into the back of the shoulder. These three techniques are great way to start and warm up the general area. From here you can roll onto your side and position the roller in your arm pit to better target the smaller, deeper muscles where they sneak through from the shoulder blade to the humerus (you will want your arm position up over head with palm facing up towards the ceiling). Start by rotating or rolling forward and back in this position and work your way up to actually rolling from shoulder to rib cage (this will be very tender and may take some time to work up to!).
#2 Tennis ball- cross friction.
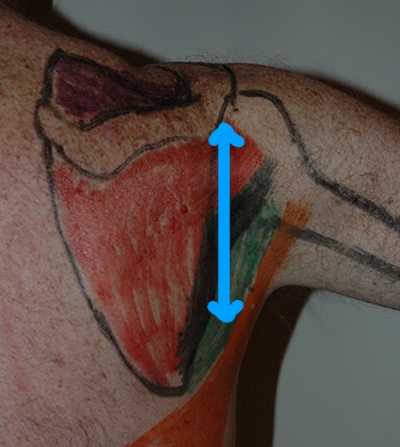
The key with cross friction is to remember that you are working perpendicular to the muscle fibers. This means that you will be working in an up and down direction. The movement itself is very small (maybe 1-2 inches). Sink the tennis ball in deep, relax and then maintain that depth as you work. If you feel like the ball is rolling or sliding, you’re moving too much. When working on the posterior shoulder, the primary location for trigger point work will be at that intersection at the back of the shoulder. You can start by laying flat on your back and progress to laying on your shoulder. Both ways are demonstrated in the video. If you’re still unsure of the cross friction technique and how to properly do it, click here for a review.
#3 Tennis Ball- Trigger point.
When moving onto trigger point areas, stick to the intersection spots. There is a LOT of overlap in the back of the shoulder. Remember, let the tennis ball sink in nice and deep and just sit on it. If after 2-3 minutes it hasn’t released, move onto the next spot!
1) Start just below the outer part of the spine of scapula and work your way down through the infraspinatus and the teres minor/major. Think three tennis ball widths and you will have all of them covered. If you don’t feel like you can get enough pressure laying flat on your back, roll over onto your side. From here you should be able to lean in for plenty of pressure. If that still isn’t enough, try rotating your arm to find the spot.
2) The Latissimus Dorsi. Once you’ve covered the back of the shoulder, slide the ball down over your ribs. The Lats usually have some fun trigger point spots. The meatiest part of the muscle is along the ribcage just below the shoulder blade.
3) The Tricep/Deltoid intersection. The triceps can be a sneaky source of tension. Try sliding the tennis ball over to just below the delt and roll onto your side for this one.
4) Lastly, if the back of your shoulder is full of knots/tension, always check the main muscle belly’s of the infra and supraspinatus muscles.
Video
Here is a video demonstration of the muscle release techniques for the shoulder.
References
1) Hammer, Warren. (2007). Functional Soft-Tissue Examination and Treatment by Manual Methods, 3rd edition. Jones and Bartlett Publishers, Inc, Sudbury, MA.
2) Hyde, Thomas and Gengenbach, Marianne. (2007). Conservative Management of Sports Injuries, 2nd edition. Jones and Bartlett Publishers, Inc, Sudbury, MA.
3) Moore, Keith and Dalley, Arthur. (1999). Clinically Oriented Anatomy, 4th edition. Lippincott Williams and Wilkins, Baltimore, MD.
4) Muscolino, Joseph. (2009). The Muscle and Bone Palpation Manual. Mosby, Inc, St. Louis, MO.

