Self Muscle Massage- pt 3 Posterior Hip
This is part three of the self muscle massage series. In the introduction post to this series, we discussed and demonstrated the three soft tissue release techniques that will be used below. If you missed it or would like to review them you can do so here. If you would like to see the last two muscle groups, you can find them here.
Of all the areas I’m asked about, the hip is easily one of the most popular. It’s also one of the most complex in terms of it’s muscle/mobility and joint structures.
On a muscular level, there are multiple layers working together to move the hip through three different planes of motion:
1) flexion and extension-forward and back
2) adduction and abduction- in and out from the vertical midline of the body
3) internal and external rotation- rolling the leg so that the outside of ankle is up towards the ceiling (internal) and rolling the leg so that the inside of ankle is up towards the ceiling (external).
On a bony/joint level, the hip is part of the lumbo-pelvic-hip complex. This means that the hip joint is part of the pelvic bone and can be influenced by the lumbar portion of the spinal column and vice versa. If one end of the chain is disrupted, the other end will also be affected.
With that being said, I’m going to be talking about the hip over the next three installments in the blog. This will help break down the information and allow focus on each of the major muscle groups in isolation instead of throwing it all together into one big confusing blob of information.
To start, we’re going to talk about the back of the hips first. This is where the large gluteus maximus muscle is located and beneath it, the external rotators (the piriformis being the most popular). This area is susceptible to injury for several reasons. As your leg moves into full extension during the push off portion of the gait cycle, the gluteus maximus is the primary muscle responsible for hip extension. The external rotators assist in providing this extension and take on a much larger role in situations where the leg is rotated and extension is required. If the leg becomes rotated for an extended basis due to muscle imbalances, weakness, or contractures (chronic shortening of a muscle), the smaller rotators can become overused and injured.
To give you some examples of how this might occur:
1) Hyperpronation/Hypopronation at the foot/ankle. Chronic abnormalities at the foot and ankle joints are commonly associated with rotation of the entire lower leg. This rotation occurs over time as a compensation mechanism to maintain propulsion while walking (as the foot rotates in/out the gastroc is unable to provide push off). The result is that instead of push off coming from the calf, quads, and glutes, the workload is shifted up the leg chain to the hip extensors (hamstrings, glutes, external rotators). With the rotation of the leg, the workload is shifted more and more to the small external rotator muscles.
2) Tight Adductor Muscles/Weak Abductor Muscles. In the hip joint, the outer abductor muscles help stabilize the pelvis while walking, keeping it level as you stand on one foot and the other swings through. It is common for these muscles to become weak/overused, resulting in tight adductor muscles that over time can become contracted. In addition to pulling the thigh bone (femur) in towards midline, the adductors can also assist with hip extension and internal rotation. As they become contracted, hip extension will become limited (increasing the workload on the gluteus max) and the tight internal rotators can put the external rotators on stretch (making them more susceptible to injury).
Anatomy:
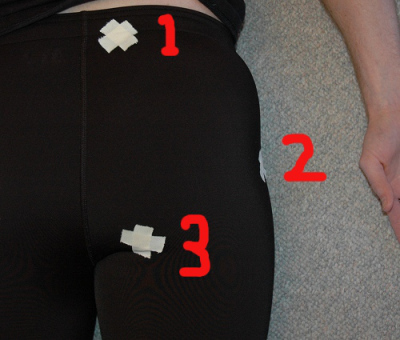
Unlike the calf and hamstrings where you can see the muscles you’ll be working on, the external rotators are hidden beneath the gluteus maximus. To find them, we’ll use three bony land marks: 1) PSIS (posterior superior iliac spine), 2) Greater Trochanter, 3) Ischial Tuberosity (sit bone).

#1 the PSIS. To find this one, you’re going to start with your hands on your hip bones (iliac crest) so that your thumb is pointing towards your back and your fingers are pointing forwards towards your stomach. As you reach behind with your thumbs, you’re looking for two small bumps on either side of your spine. Visually, you can see them. They are the two “dimples” at the small of your back.
#2 The Greater Trochanter. This landmark is the insertion point for all of the external rotators. To find it, start with your thumb on top of your hip bone at the highest point of the iliac crest. From there, simply lay your hand down over the outside of your hip with your fingers pointed down towards the floor. The greater trochanter can be found under or close by where your middle finger is (it will be a small bump).
# 3 Ischial Tuberosity. Of the three landmarks, the IT is the easiest to find. Simply sit on your hands. You will feel the two “sit bones”. They are in the middle of the gluteal fold on both sides.
The Muscles
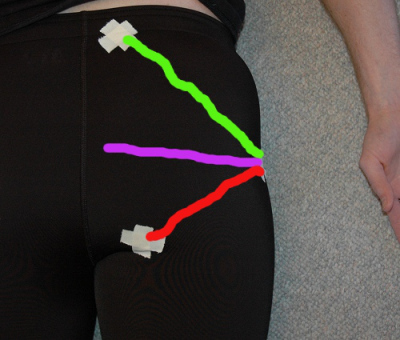
An easy way to visualize the external rotators is as a fan. They all insert onto the greater trochanter and then fan out from the PSIS to the IT. The larger gluteus max then lays on top of these muscles.
1) The Piriformis Muscle (Green Line)
2) The Superior Gemelli, Obterator Internus, Inferior Gemelli (Purple Line)
3) The Quadratus Femoris (Red Line)
4) Gluteus Maximus- the glute max covers the rotators. It originates on the sacrum (tail bone) and then inserts into the posterior femur.
Soft tissue release techniques:
What you’ll need: foam roller and tennis/trigger point ball
Techniques:
1) elongation/lengthening with foam roller
2) cross friction with tennis ball
3) sustained pressure/trigger point release with tennis ball
Key Areas to Work on:
Unlike the calf and hamstring where there were common points of injury, the trick for working on the back of the hip is to cover all of the fan. When the hip tightens up, you want to release it in all directions. Because the external rotators are deep to the glute max, cross friction and sustained pressure (trigger point) techniques work best on this area. As a general rule of thumb, I start off with the elongation technique using the foam roller. This will help to loosen up the area and to locate any deeper muscle spasms or knots. I then use the cross friction technique and work my way through each of the muscles in the fan.
Lastly, here is a video to demonstrate the techniques and how to use them on the posterior hip.
References:
1) Hammer, Warren. (2007). Functional Soft-Tissue Examination and Treatment by Manual Methods, 3rd edition. Jones and Bartlett Publishers, Inc, Sudbury, MA.
2) Moore, Keith and Dalley, Arthur. (1999). Clinically Oriented Anatomy, 4th edition. Lippincott Williams and Wilkins, Baltimore, MD.


One Response to “Self Muscle Massage- pt 3 Posterior Hip”