In this installment of our “injury of the week” series we’re going to be talking about hip flexor strains. We’re going to keep the same format we’ve had all along. First we’re going to start off with a review of what the injury is and talk about if this is what you have and when you need to worry/consult your doctor. From there we’re going to take you through the steps of the A-T-A self treatment system so that you’ll have a “sample treatment session”.
Hip pain can hands down be one of the most frustrating injuries to treat. The joint itself moves in six different directions which means there is a whole army of muscles needed to move it. With that many moving parts, it’s easy for muscle imbalances to develop and for entire muscle groups to lock up. When this happens, the hip flexors are a common victim.
Potential Causes of Injury
1) During normal ambulation, the hip flexors are active during the swing phase (meaning they pull the leg through to start the stance phase all over). With normal push off at the big toe, knee, and hip, part of this motion is passive (meaning the hip flexor can use that momentum to lesson the load on itself). If the push off is incomplete ( as is the case with chronically tight gastrocs and hamstrings for example), the hip flexors must pick up the slack and actively pull the leg through. This can result in a tendon/muscle overuse injury or an acute injury due to a forceful contraction.
2) Due to their location, the muscles in the front of the hip are prone to contractures due to prolonged sitting. As the muscles adapt to that shortened position, they limit hip extension and subsequently push off. This can result in tendon/muscle injuries.
3) In the presence of an anterior pelvic tilt (when the front of the pelvis tips down towards the ground), the anterior muscles are kept in a shortened position and can lead to contracture over time. The hamstring muscles in the back of the thigh are then weakened by being kept in a lengthened position. As the back of the hip is unable to extend, the hamstrings are also unable to compensate, and the hip flexors are left to do all of the work.
4) Combine any of the above scenarios with a deviation from mid-line (when the the whole leg is pulled in towards mid-line) and it is not uncommon for the tight and overworked anterior muscles to get pulled out of their grooves and begin sliding/snapping over the hip bones. This is commonly referred to as snapping hip syndrome.
So what do you need to know as an athlete after reading that. The hip flexor is at the top of the leg chain. That means that an injury here that is frequent or doesn’t want to go away is a sign that something else is going on as well. Either the hip isn’t moving properly or the hip joint is trying to pick up slack for imbalances downstream in the leg or upstream in the core.
My hip hurts. Now what?
First things first. Like we’ve said all along. This site is not designed to keep you from your doctor and healthcare team. It’s designed to teach you the things that you can do at home to help alleviate symptoms and prevent them from becoming a full blown injury. That being said, the hip can be a complex place. If you have any of the following, time to see your doctor. Numbness/tingling in the hip/front of your thigh. Burning pain or pain in multiple locations (i.e. down the front of the thigh, outside of the hip). Pain into the groin. Difficulty putting weight on your leg. Popping in the hip that is painful or feels like the joint is getting stuck. If you aren’t making any progress? See your doctor. Remember, the thing to keep in mind with nagging symptoms in the hip is that it might not be muscular. It could indicate something going on in the joint itself or something further upstream in the back. Numbness and tingling or pain down into the groin are big red flags, but so are continued symptoms that don’t improve regardless of treatment. If your injury started because you felt a pop or while you were actively lifting something? See your doctor.
Be smart when self treating at home. If you aren’t getting better, get some help. I can’t tell you how many patients I get who wait weeks and even months before coming in for treatment. The longer you wait, the harder it is to get rid of. Here are some tips for finding the right health care professional:
- Find someone certified in soft tissue mobilization, whether it’s instrument assisted like Graston Technique or hands on like Active Release (ART). This is where you need to do your homework to see who’s near you. Follow the links to those sites to search their provider lists and read up on what each is all about. A tight hip will definitely benefit from some hands on/massage work. When looking for someone on the ART list you’re looking for spine certified.
- Not every PT and chiropractor are created equally. Some do very little soft tissue work and rely mostly on exercise and manipulations. Others do not. We all specialize in our own little areas. Frustrating right? Not really. Most of us have websites to tell you what we are certified in. If we don’t? Pick up the phone and call us. There’s nothing worse than wasting 8 insurance visits not getting better only to switch places and have them fix it in two.
How to treat it.
**download PDF with links, sets, reps, progressions, etc here**
Step 1- Traditional R.I.C.E. treatment:
When a new muscle injury occurs, the first and most important goal is always to decrease pain and any swelling that may be present. In other words, we want to decrease inflammation. That means ice is mandatory. Absolutely no heat no matter how good it feels. Don’t short cut this stuff. It’s boring but it works, especially if your symptoms worsen as the day goes. It’s now easier than ever to smuggle an ice pack into the office fridge and wear compression gear under your dress clothes. Use that to your advantage when working to heal an injury!
Rest: This may sound obvious, but I’m going to say it anyway. An injured muscle/joint will require a decreased activity level to fully heal. The severity of the injury will determine if this is a full rest or more of an active recovery.
Ice: while heat may feel better on stiff and sore muscles, ice only during the first 7 days following injury. This will help to decrease swelling, inflammation and pain. 10-15 minutes is sufficient and you can perform every hour as needed. Avoid direct ice to skin contact.
Compression: thanks to the recent explosion of compression sleeves, tights, shorts, etc, you have several options in this department. Ideally you want something that is snug without being uncomfortably tight (think recovery tights if you’ve ever worn them). For an injury like a hip flexor strain, I personally opt for a pair of compression shorts.
Step 2- Kinesiology taping:
Here is a taping application to decrease pain/promote recovery following a hip flexor strain. Everything you need to know is in the blog post. Click here.
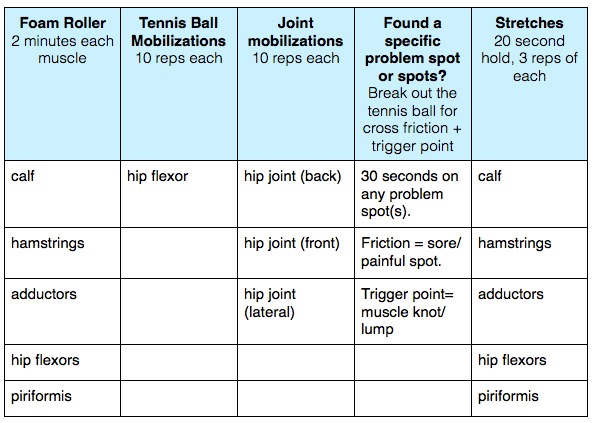
Step 3- Getting mobility back:
The second goal is going to be to loosen up the injured area. Below I have the treatment techniques set up in levels. As a rule, you must be able to complete #1 without pain to progress to the next level. Be smart! Healing a muscle sprain/strain isn’t about no pain, no gain. The muscle needs to heal! Don’t overdo it in an attempt to speed up your recovery.
1) R.I.C.E. + gentle stretching. There should be no pain with stretching. .
2) Begin using the foam roller AROUND the injured area. The goal here is to start getting slack into the muscle without aggravating the injury itself. No tennis ball work or active/joint mobilizations. The order should be foam roll around injury -> stretch -> RICE.
3) Begin using the foam roller over the injured area to tolerance. The order should be foam roll around injury-> over injury -> stretch -> RICE.
4) Begin using the tennis ball for active/joint mobilizations. The order should be foam roll around injury -> over injury -> active/joint mobilizations -> stretch -> RICE.
5) Begin using the tennis ball for cross friction + trigger point. These are the deepest of the soft tissue techniques so you want to save them for last to target specific adhesions and restrictions. Consider this your fine tuning step.
How long do you need to R.I.C.E for??? Until it’s 100% gone.
Here’s what it looks like for the hip flexors. Use the guidelines above.
Step 4: Strengthening
We’ve broken the exercises down into three levels based on pain levels. This stuff should NOT hurt. If it does, go back a level or ease up on the resistance. Only progress as pain free.
What you’ll need: 1) resistance band/tubing. This is easy to find in any sporting good store these days. You can probably even get it in walmart or target.
Optional equipment: 1) a balance disc. Always good to add difficulty to your strength exercises. Affordable too at $20. 2) a stability ball. Same story as the disc. You can find these cheap and just about anywhere.
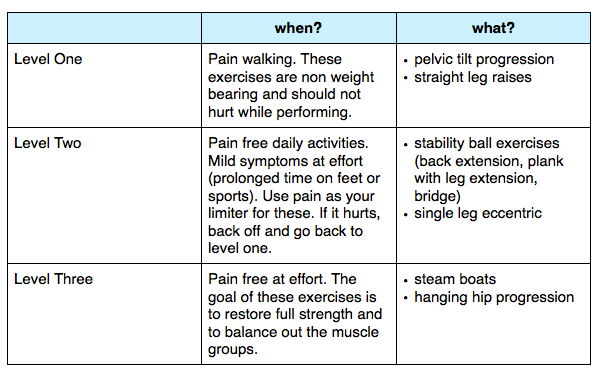
Video’s for each level are here. Please note, in the PDF download you will find details for reps and difficulty progression, as well as, benchmarks you should meet before progressing to the next level. The video’s show you the basics for each exercise and what they look like.
The number one thing to remember is that these exercises should be pain free. If you’re getting discomfort, go back a level. You can’t force this injury to heal, but you certainly can make it worse if you over do it.
Level One
Level Two
Level Three
Hope that helps, and fire away with any questions in the comments section!
(***BONUS MATERIAL: I wrote this PDF a few years ago when I was working with a few athletes trying to get past chronically cranky hips. The info is limited to the self massage techniques we use on the site, but it gives a nice overview of the why behind what muscle groups were focusing on and the types of hip abnormalities that can sneak up on us. Click here for the download.)
References
1) Capobianco, Dr. Steven and van den Dries, Greg. (2009). Power Taping, 2nd Edition, Rock Tape Inc, Los Gatos, CA.
2) Hammer, Warren. (2007). Functional Soft-Tissue Examination and Treatment by Manual Methods, 3rd edition. Jones and Bartlett Publishers, Inc, Sudbury, MA.
3) Hyde, Thomas and Gengenbach, Marianne. (2007). Conservative Management of Sports Injuries, 2nd edition. Jones and Bartlett Publishers, Inc, Sudbury, MA.
4) Kase, Kenzo, Wallis, Jim, and Kase, Tsuyoshi. (2003). Clinical Therapeutic Applications of the Kinesio Taping Method.
5) Michaud, Thomas C. (2011). Human Locomotion. Newton Biomechanics, Newton, MA.
6) Muscolino, Joseph. (2009). The Muscle and Bone Palpation Manual. Mosby, Inc, St. Louis, MO.