Calf Basics Level One Plan

In this level, you will find four types of workouts: 1) stretching, 2) self massage, 3) strengthening, and 4) kinesiology taping.

  • Stretching: The goal here is simple. we want to build slack back into the leg chain as a whole, especially the calf. Since the anatomy crosses three joints, we will start by covering all three. As mobility improves and you progress through this course, we will be eliminating muscle groups and narrowing our focus.
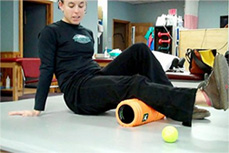
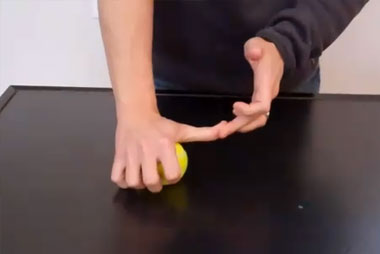
  • Self Massage: In level one, we will be using a foam roller/massage stick. Just like with the stretches, we will be working one joint above and below to make sure each of the layers of muscles in the calf is loosened up. The focus in this lesson will be learning how to flush out an area using the elongation technique.
  • Strength: In level one, our strength work will be focused on restoring balance to the opposite end of the leg chain. Why? A strong core will be able to hold your pelvis regardless of what you’re legs are doing. That means full access to the larger hip muscles so that your poor calf can get some much needed help.
  • Kinesiology Taping (optional): When things are sore and achy, taping is a great way to prolong the benefit of your mobility and strength work. This tape is not the rigid athletic tape you may be familiar with from team sports. This is elastic tape that pulls against itself to provide proprioceptive feedback. We’ll dive into this later in the lesson.

Here are the details:

Stretching Routine Roller/Stick Routine Strength
  1. Gastroc
  2. Soleus
  3. Posterior Tib/Toe Flexors
  4. Peroneals
  5. Shin
  6. Toes
  7. Hamstring
  8. Adductor
  1. Bottom of foot
  2. Gastroc
  3. Soleus
  4. Posterior Tib/Inner Shin
  5. Top of Foot
  6. Shin/Peroneals
  7. Hamstrings
  8. Adductors
  1. Pelvic Tilt Progression
    1. pelvic tilt
    2. tilt with straight crunch
    3. tilt with oblique crunch
    4. tilt with dying bug
    5. bridge
  2. Back Progression
    1. alternating single leg extension
    2. alternating arm and leg extension (swimmers)
    3. supermans
    4. superman/banana
30 second hold for each 1 minute per muscle group 5 second hold, 10 reps of each.
Total time for workout = 4 min per leg Total time for workout = 8 min per leg Total time for workout = 9 minutes

One or both legs for the stretches and self massage?

This is completely personal preference and based on how much time you have available to you that day. For me it’s simple? If I have the time, I do both. If I don’t, I focus on the leg where my symptoms are. At the very least, I recommend trying your “good” leg at least once. It may not be symptomatic at all but it may be just as tender or surprising as the one you are focusing on.

How often?

Day One Day Two Day Three
“Good” stretch self massage strength
“Better” self massage + stretch stretch + strength self massage + stretch
“Best” stretch am + self massage/stretch pm strength am + stretch pm stretch am + self massage/stretch pm

The key with any formal self massage or mobility work is that you want to be consistent and you want your sessions to be repeatable! Having a killer session that leaves you sore for three days will not speed up your recovery. In fact, it will probably make it worse. Here are some guidelines:

  • Above you will see three options: good, better and best. These options are all based on the free time you have available.
  • “Good” is the minimum. Pick one workout a day and make sure it gets done. If you find yourself having free time, make stretching the priority at this stage in the recovery.
  • “Better” means finding those four minutes to stretch every day. The good news? Even with the extra work, you’re still looking at less than 15 minutes a day.
  • “Best” means two a days. This set up isn’t forever. It’s just to get that initial mobility boost you need to see quick results.

Ground rules:

  • Go easy the first time through! It is very possible to overdo this stuff and the “no pain, no gain” mentality will likely just slow down your recovery.
  • If you do find yourself sore after the first session, follow with 10-15 minutes of ice and take the next day off from the massage/strength work. Gentle stretching is okay.
  • When you are able to do these routines without soreness or difficulty, you can progress to level two.

Self Muscle Massage

What: 

The first priority of any self treatment plan should be to restore mobility to the injured area and surrounding muscles. An injured muscle wants to protect itself by staying in a tight, protectected position. This keeps it from being over stretched into further damage and from having to contract through it’s full ROM. The problem with this is that it’s not always painful, especially not in the case of common overuse injuries. If there is one thing the body is good at it’s compensating. When one part doesn’t work, others are called in to pick up the slack. This is bad! We want to stop this from happening and work to get those muscles out of that closed up, tight position. The first way to do that is through self muscle massage using one of the tools below.

How:

An easy way to look at self massage is to break it down into the three different ways or directions that you can loosen up a muscle.

  1. You can elongate or stretch out the muscles ( in other words, work parallel or in the same direction the muscle runs ).
  2. You can work perpendicular to the muscle (known as cross friction and used to break up specific adhesions).
  3. You can apply sustained pressure to the muscle (known as trigger point release and used to relieve muscle spasms).

What you need to get started:

A foam roller and a tennis/massage ball.

temp-product-image

Mobilization Techniques

What: 

The self massage techniques listed above are a great way to get some slack into the muscles and start the process of restoring that lost mobility, but sometimes a more aggressive technique is needed to shake things loose. That’s where mobilization techniques come into the picture. The ATA Series utilizes two types of mobilizations.

How:

  • Muscle Mobilizations: These are used for actively breaking up adhesions/ restrictions within the muscle itself. This is accomplished by anchoring down one end of the muscle and then actively stretching out the other end.
  • Joint Mobilizations: Joints are composed of two bones held together by a joint capsule and ligaments. To mobilize them a resistance band is used to hold one bone in place while we move the other.

What you need to get started: 

A tennis ball, resistance band, and a foam roller.

Shoulder Treatment Part Two

Hi everyone! This week we continue to dive into the treatment portion of our shoulder series. In part one, we used the foam roller to target the large musculature below the shoulder. When tight and immobile those muscles (aka the lats, the pecs, the serratus…) can act like weights that pull down on your shoulder joint. Not only does this force the arm to work harder to get overhead, it also keeps the shoulder joint unstable and out of position. In that treatment post we also worked on the neck muscles that attach to the top of our shoulder blade (aka the levator and upper trap).

This week we’ll be moving closer to the shoulder to start restoring balance between the front and back of the shoulder. To that you’ll need a massage ball or tennis ball!

Here’s the breakdown:

  • Muscle mobilizations: 3 reps nice and easy of the pecs (3 arm positions) and 3 reps nice and easy of the back of the shoulder (two rotations and across the chest)
  • Stretches: 30 seconds x 2 of each (bicep and tricep)
  • Total time = 8 minutes